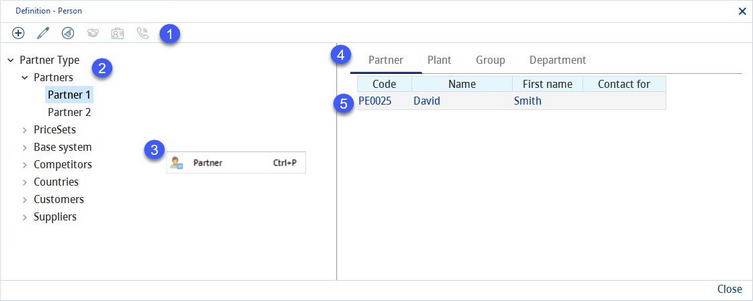
In this dialog, contact persons can be assigned to partners that have been created already.
1)Add: Create a new contact person for the selected partner.
Edit: Edit selected person.
Delete: Delete selected person.
2)Partner structure: A hierarchical view of the partner structure. Select a partner from this list to see all assigned contact persons.
3)Partner: Right-click on a partner in the partner structure section to assign a partner or a plant (depending on the partner type). This will open the Administration → General → System Settings → Partner structure dialog.
4)Partner type: Information about the type of the selected partner.
5)Persons: A list of contact persons assigned to the selected partner. Double click on an entry from the list to edit contact details of the person.
Editing Personal Details
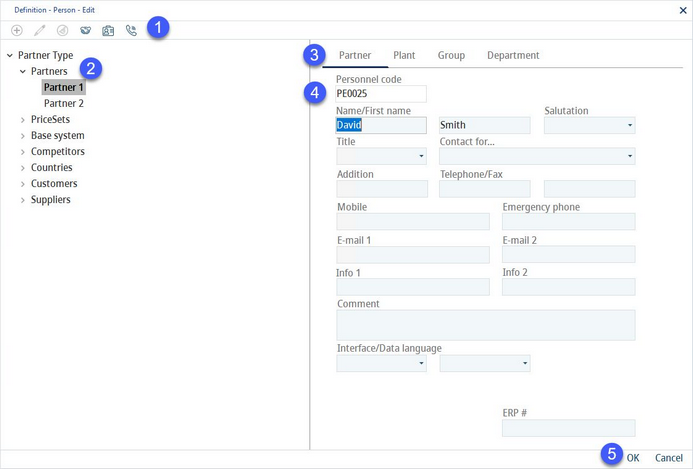
1)Salutation: Edits/translates the options for the respective selection list (labelled 4).
Title: Edits/translates the options for the selection list (labelled 4).
Contact for: Edits/translates the options for the selection list (labelled 4).
2)Partner structure: A hierarchical view of the partner structure. Select a partner from this list to see all assigned contact persons.
3)Partner type: Information about the type of the selected partner.
4)Contact details:
Personnel Code: An automatically generated identification number.
Name/First Name: The surname/first name of the person.
Salutation/Title: Click on the icon (labelled 1) to edit the selection list with available salutations or titles. It is also possible to provide translated versions of salutations and titles.
Contact for: Select the department or main responsibility from the drop-down list. This selection list can be adjusted by clicking on the icon (labelled 1). It is also possible to provide translated versions of salutations and titles.
Function: Job title or any other additional information.
Telephone/Fax/Mobile phone/Emergency phone: Phone/fax numbers.
Email 1, Email 2: The main and alternative e-mail addresses.
Information 1, Information 2: Additional contact information.
Comment: Enter a custom comment on the person.
Interface language: This field is related to users and can be left blank for other contact persons. See Administration → General → User Settings → User for more information.
Data language: This field is related to users and can be left blank for other contact persons. See Administration → General → User Settings → User for more information.
ERP no.: Enterprise Resource Planning number associated with the person.
5)OK: Confirm changes.
Cancel: Cancel operation.
Translating Salutations, Titles and Contacts for Selection Lists:
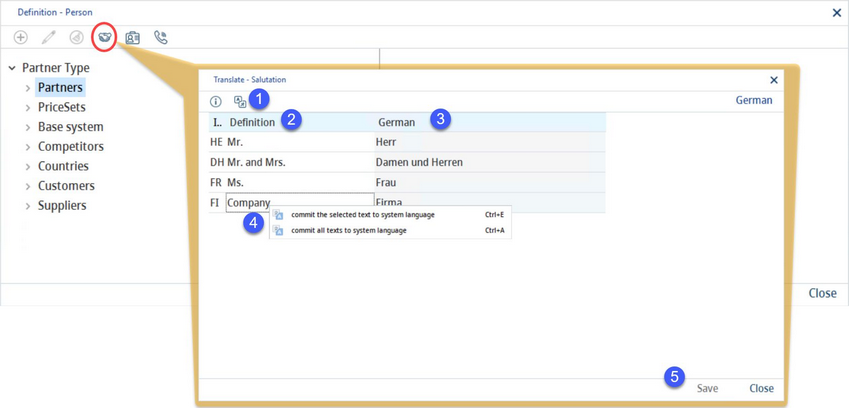
For any of the icons, select the appropriate salutation, title, or contact and click on the translate icon ![]() to open the dialog.
to open the dialog.
1)The dialog hint: Hovering over this icon provides instructions on how to use the dialog.
Language: The language to be translated.
2)Definition: The language name in the system language. (In this case, the system language is English. Any changes to English will be applied to this column in all languages.)
3)Target language: Enter the translation in this column.
4)Commit the selected text to system language: Right-click option; the selected target language text will be overwritten with the system language text. This option is available only in column Definition.
Commit all texts to system language: Right-click option; all target language texts will be overwritten with the system language texts.
5)Save: Save all translations.
Close: Exit the dialog.


