Define activities and facilities to be used in Costing/Work method.
1)Stage/Facility groups: Create, edit, and translate activity or facility groups. See below for more information.
Language: Select the user language.
2)Activities/Facilities tab: Select the type of data to configure. The dialogues for activities and facilities contain exactly the same options.
3)Edit administration: Enable data editing in the Administrator view.
4)Administrator view/User view: When Administrator view is selected, only administrator will be able to view the activities/facilities.
5)Select job activity group/Select facility group: Depends on the tab selected (1).
6)ID: An automatically assigned identification code.
Code: The user-assigned code.
Activity/Facility: The activity/facility name.
Set-up hourly rate variable: The variable hourly rate for item.
Set-up fixed hourly rate: Enter fixed hourly rate for item set-up.
Hourly execution rate var.: Enter variable hourly rate for item.
Hourly execution rate fixed: Enter fixed hourly rate for item.
Short description: Enter a short description.
Alternative description: Enter an alternative description (e.g. used formally in an external system).
CC: Enter cost center ID.
Active: If not selected, the option will become unavailable for selection in the Costing module.
7)Save: Save the changes.
Close: Close the dialog.
Stages
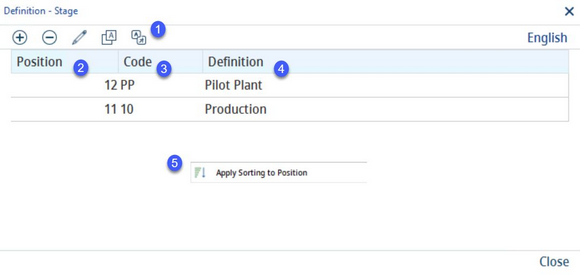
1)Add: Add new activity/facility.
Delete: Delete activity/facility.
Edit: Modify activity/facility.
Close: Close the dialog.
Translate: Translate activity/facility names.
Language: Select the user language.
2)Position: Define the order of activities/facilities.
3)Code: The identification code of activity/facility.
4)Definition: The name of activity/facility.
5)Apply sorting to position: Right-click option; applies the standard sorting logic (series of numbers with the common difference of 5).
Translating Master Data Costing:
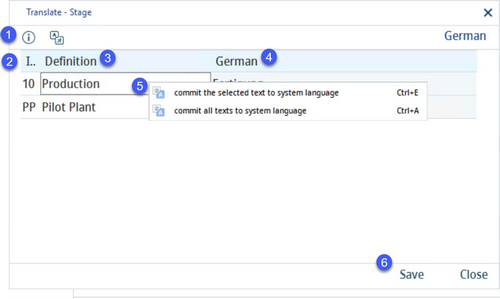
By clicking the Translate![]() button, you will open a new dialog that can be used to translate the texts that are listed.
button, you will open a new dialog that can be used to translate the texts that are listed.
1)The dialog hint: Hovering over this icon provides instructions on how to use the dialog.
Language: The language to be translated.
2)ID: The internal identification number.
3)Definition: The name in the system language.
4)Name in the target language.
5)Commit the selected text to system language: Right-click option; the selected target language text will be overwritten with the system language text. This option is available only in columns Unit and Designation.
Commit all texts to system language: Right-click option; all target language texts will be overwritten with the system language texts.
7)Save: Save the changes.
Close: Close the dialog.


