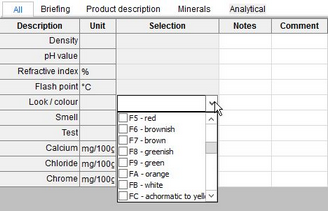
A selection list represents a drop-down menu with predefined options that can be assigned to criteria for use in columns Selection, Customfield, etc. (example below) or can be used for a specific purpose (e.g. list of HACCP risk classes).
Some of the selection lists are already predefined. For example the Countries selection list used in multiple places in SpecPDM was predefined in accordance with the ISO 3166-2 standard.
Description:
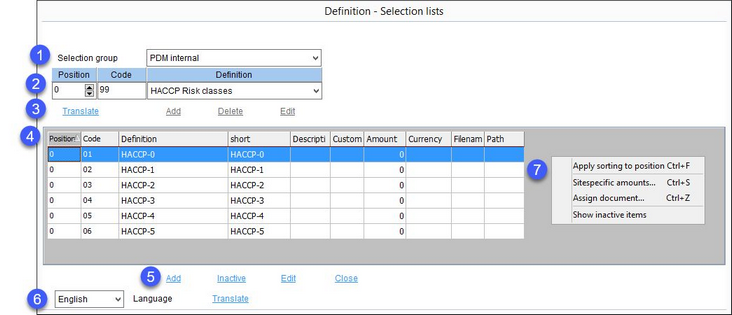
1.Selection group: Selection groups are pre-defined for PDM, LIMS and GS1 and cannot be changed by the user. Each selection group contains several selection lists.
2.Selection lists: Selection lists are characterized by their unique code and definition. These codes are to be used in certain program parameters.
3.Add: Insert new selection list. This option is available only for the following groups: Customer LIMS, Customer PDM.
Delete: Delete the existing selection list. This option is available only for the following groups: Customer LIMS, Customer PDM.
Edit: Edit the selection list.
Translate: Translate the group names.
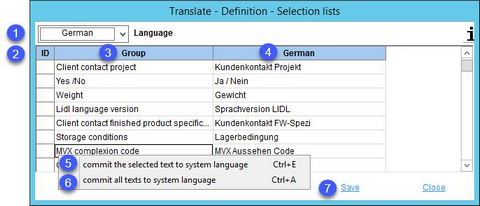
1)Language: The language to be translated.
2)ID: The identification number (optional).
3)Group: The group name in the system language.
4)Group name in the target language.
5)Commit the selected text to system language: Right-click option; the selected target language text will be overwritten with the system language text. This option is available only in column Group.
6)Commit all texts to system language: Right-click option; all target language texts will be overwritten with the system language texts.
7)Save: Save the changes.
Close: Close the dialog.
4.Position: The position of the item within the selection list.
Code: The item code.
Definition: The item name.
Short: Short variant of the name. This name is used, for example, in Master data/Ingredients when selecting manufacturing countries that are then displayed using abbreviations (see the following image).
Description: This description can be displayed on a mouse-over over the selected item (see the image below).
Customfield: This field can be used for any kind of supplementary information.

5.Add: Add a new selection list item.
Inactive: Set selection list item to inactive - it will become unavailable. To change the item back to active, first make sure that the Show inactive items right-click option is selected. Then mark the checkbox in column Active.
Edit: Edit selection list item.
Close: Close the dialog.
Translate: Translate the names of selection list items, as well as short names, descriptions and customfields.
1)Language: The language to be translated.
2)The item name, short name, description and customfield in the system language and target languages.
3)Commit the selected text to system language: Right-click option; the selected target language text will be overwritten with the system language text. This option is available only in the system language columns.
4)Commit all texts to system language: Right-click option; all target language texts will be overwritten with the system language texts.
5)Save: Save the changes.
Close: Close the dialog.
6.Language: Data language selection.
7.Right-clicking the Selection lists dialog opens a context menu with the following options:

Apply sorting to position: Applies the standard sorting logic (series of numbers with the common difference of 5).
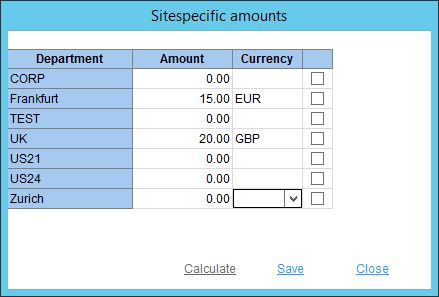
Sitespecific amounts: Allows entering specific amount and currency for individual factories. The Amount field becomes highlighted when a site-specific amount is defined.

Assign document: Opens the standard document selection dialog where a document can be attached to the selection list.
Show inactive items: Displays items that have been set to Inactive.


