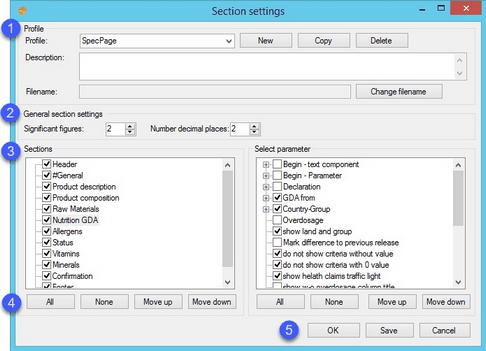
When selecting a reporting option with profiles enabled, you can perform the following actions:
1.Profile: Select the desired profile. Select Other section settings to manage profiles. This feature is described below.
2.See Reporting/Functions & Processes/Working with Basic Reporting Dialogs for more information.
Managing Profiles
1.Profile section: Allows you to create new, copy, or delete profiles. In addition, you can also insert a profile.
Profile: Select from a list of existing profiles.
New: Create a new profile.
Copy: Copy all profile settings and also translations.
Delete: Delete the selected profile.
Description: Type a description for the profile. This description will not be included in the report.
Change Filename: To change the settings of the report's filename, click the Change filename button. Details are described below.
2.General section settings: Here, you can select the way the numbers in sections are rounded. They can be rounded according to set significant figures or decimal places. In case you do not select either of these options, the numbers will be loaded as they exist in SpecPDM. See Reporting/Functions & Processes/Functionality and Content of Sub-reports for more information.
3.Sections: Select a checkbox to make it visible on the report, and configure it via the Select parameter section on the left. By right-clicking on a specific section, you can select Change translation. For more information, see Reporting/Functions & Processes/Reporting Localization.
Select parameter: You can select relevant parameters belonging to chosen section. The parameter selection uses a tree representation: click the small ![]() sign to see the consequent levels. If you select the checkbox of a parameter with sub-levels, all sub-level parameters will be marked as selected, as well. (In special cases, when only one value [on the same level] is allowed to to be chosen, the first value will be selected, by default). You can select relevant parameters belonging to the chosen section. In general, for each section you can determine:
sign to see the consequent levels. If you select the checkbox of a parameter with sub-levels, all sub-level parameters will be marked as selected, as well. (In special cases, when only one value [on the same level] is allowed to to be chosen, the first value will be selected, by default). You can select relevant parameters belonging to the chosen section. In general, for each section you can determine:
•Which fields and parameters will be printed.
•Which columns will be visible.
•The sorting of the printed parameters (not all values can be sorted. e.g. only Attributes, Allergens, etc. can be sorted).
•Which rounding option to use.
The following parameters are obligatory for each section:
•Begin - text component.
•Special settings.
•End - text component.
•Text components for each section can be defined in Administration/General/Text components. Here, you can decide whether the created text component should be visible for the selected profile. The special settings depend upon the type of section, e.g. in product composition, where you can choose which columns containing ingredients will be printed.
4.All: Select all parameters.
None: Unselect all parameters.
Move up: Move the selected parameter upwards.
Move down: Move the selected parameter downwards
5.OK: Select this button to save a temporary profile. However, you will be prompted to make a choice between saving a temporary profile or an original one. To confirm the selection, a new dialog will be opened. Click Save as temporary to save your profile only for one use (this profile will be deleted after you close the reporting tool). You can also save the modified settings to an original profile by clicking the Save to original button. This option can be selected for each profile except the default one. Press Cancel in this dialog,to go back to profile management.
Save: Save the modified settings (this button is disabled for the default profile).
Cancel: Return to the previous dialog without saving the settings.
Changing the Filename
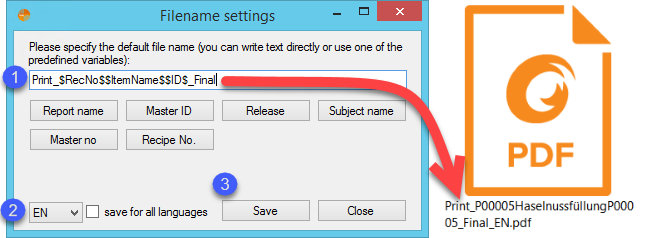
After clicking the Change filename function, a new dialog opens. Here, you can define report filename settings.

1.Name of the file name of the selected report. Press one of the buttons (Report Name, Master ID, etc.) to insert a string line, indicating the report file name will take data from the selected string into its file name (example in the picture).
2.Select the language for which the particular file name of the report will be applied. Checking the Save for all languages option will apply the file name to all languages.
3.Save: Save the created file name.
Close: Close without saving.

