Use the Definition tab to create new projects or to open existing ones. All project-related information, such as briefing, activities, checklists, to-do-lists, documents, etc. can be assigned to a project and linked to recipes and/or finished products. Setting up a new project and its assignment to development and product hierarchy involves the following steps:
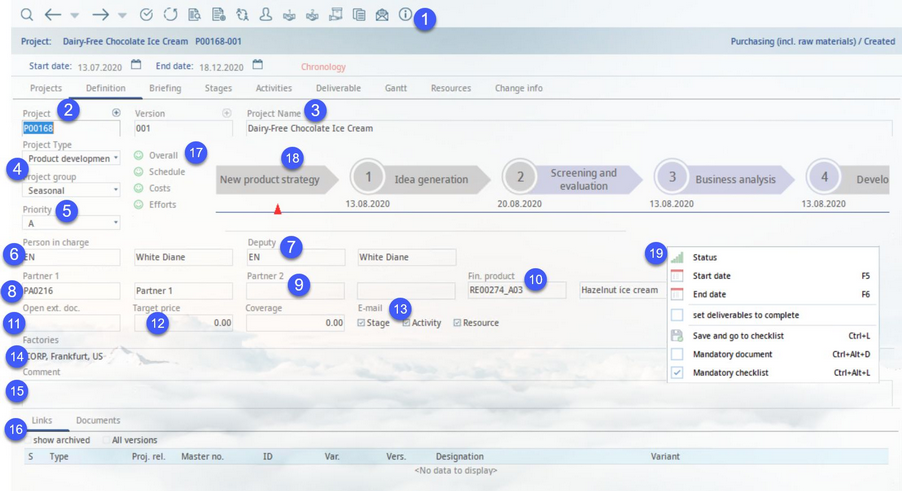
1)Module Toolbar: For more information, see Project → Functions & Processes → Basic Project Functions.
2)Project: Clicking on the + button opens the Select project dialog. Use the present filters to search for projects according to their status, department, project type, and group. Double-click on a project to load it. See Project → Functions & Processes → Create a new project for a guide on how to create a new project. You can find more information about different approaches to opening an existing project in article Project → Functions & Processes → Select an existing project.
Right-click on the Project to delete the loaded project or clear project data.
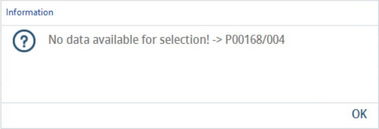
Version: To create a new release version for an existing project, click on the + button. The relevant project has to be marked as Released, however, for the button to become activated. All data except for attached files are taken over. When you edit/enter the version number and press Enter on your keyboard, SpecPDM will try to load the relevant project with its specified version ID. If such version does not exist, an information dialog will be opened:
3)Project name: You have to insert a project name. Right-click in the name field and select Edit/Translate to enter the project's name in another language.
4)Project type: Select project type.
Project group: Select project group. Both the project types and groups can be created via Administration → General → Project → Project type / group.
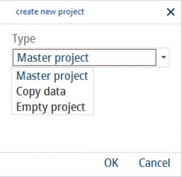
You can define a project template, which is automatically used when a particular combination of Project type and Project group is selected, in this dialog. This means that even if you select an empty project, it may be populated with stages, activities, and resources if a template for the particular combination of type and group you selected exists. You can setup project templates via Administration → General → Project → Project templates.
5)Priority: Set project priority.
6)Executive: Select the person charge by clicking the ![]() button in the taskbar. User groups can also be chosen as the person in charge/deputy.
button in the taskbar. User groups can also be chosen as the person in charge/deputy.
7)Representative/deputy: Select the representative/deputy by clicking the ![]() button in the taskbar. User groups can also be chosen as the person in charge/deputy.
button in the taskbar. User groups can also be chosen as the person in charge/deputy.
8)Partner 1: Assign partner 1 by clicking the ![]() button in the taskbar.
button in the taskbar.
9)Partner 2: Assign partner 2 by clicking the button in the taskbar.
10)Fin. product: Assign a finished product (Master data object) by clicking the ![]() button in the taskbar. The Master data component selection dialog contains information about material prices.
button in the taskbar. The Master data component selection dialog contains information about material prices.
11)Open external.: A connection with external solutions requires the following entry in the user-specific INI file named perscode_*username*.ini: (e.g. connection to external project database Projektebp.mdb) 1PROJEKT_ EXTERN = C:\Balance-P\Project\Projektebp.mdb/cdm. This will open an external project (database/data file). This is not an automated function; it has to be specifically installed.
12)Target price: Enter target price for price simulation.
Coverage: Insert coverage for price simulation.
13)E-mail rep.: Send an e-mail notification of changes in status, activity, and/or resource. Click on the button in the taskbar to select the list of recipients.
14)Factories: The factory assignment. Factories can be defined via Administration → General → Products → Dept. / Product line.
15)Comment: Enter a comment in the text field. Right-click and select Search Text to search for an existing text.
16)Links: This field contains all links that were made in the Master data, recipes, simulations, and inspection plans for this project. Click on the link to open the object in the respective module.
Documents: The list of attachments. See Introduction and conventions → Assign document for more information.
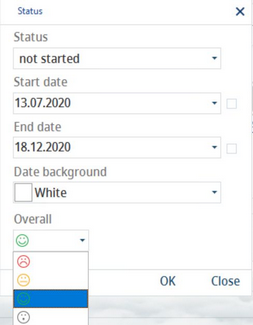
17)A pictorial view of the project's overall satisfaction status. Right-clicking in the space and selecting Status will open a dialog that allows you to edit the project's statuses.
18)Project stages overview.
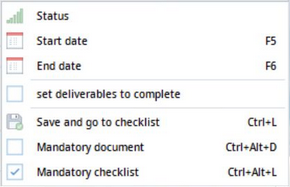
19)Right-click context menu:
Status: Opens the Status dialog where the project status, start date, as well as the end date can be specified manually at any time. If the status is automatically set to a different state, the user can modify the start and end date as well. In this case, the automatic status calculation will no longer be valid for the project.
Start date: Use the calendar window to specify the start date of the project.
End date: Use the calendar window to specify the end date of the project.
Set deliverables to complete: The global setting for all project activities which are automatically marked as completed.
Save and go to checklist: Saves changes and opens the Deliverable tab.
Mandatory document: Activate this option if a document must be assigned to the project.
Mandatory checklist: Activate this option if a checklist must be present in the project.
