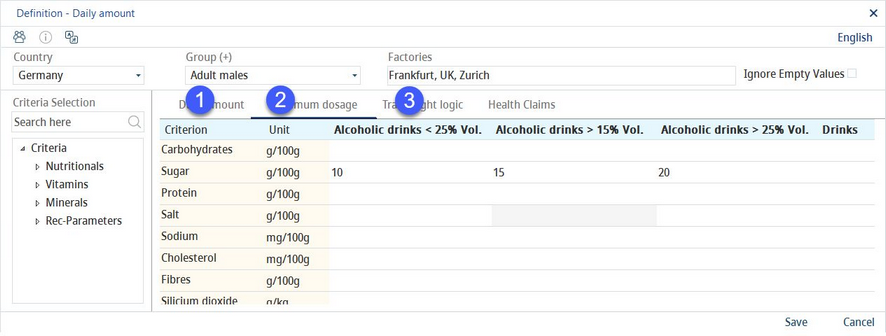
This dialog allows users to define country specific daily amounts. Furthermore, traffic light logic (highlighting system), health claims, and maximum dosage can be configured using the respective sub-tabs. The GDAs (Guideline Daily Amounts) are used in Declaration → GDAs, Master data/Declaration and in Calculation/GDAs.
This window consists of 4 tabs:
At the end of this article, you can find instructions how to create and translate declaration countries and groups.
In order to use the traffic light logic, health claims, and maximum dosage, the system administrator must adjust specific program parameters.
Daily Amount
This dialog can be used to set up various GDA alarms and warnings. When an alarm or warning is triggered, a pop-up window with the problematic values highlighted in red (alarm) or yellow (warning) appears in Calculation/GDAs. You can find an example of the pop-up window below.
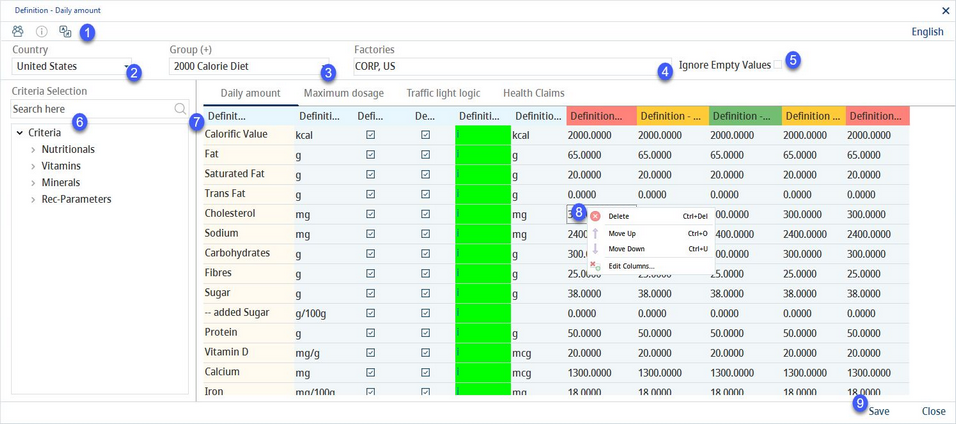
1)Group: Click on the button to create a new group.
2)Language: Select the user language.
3)Country: The country selection.
4)Group: The consumer group selection.
5)Factory: The department selector. No GDA values are displayed in Declaration → GDAs if the departments assigned here do not include the department of the recipe selected in Declaration.
6)Ignore empty values: When selected, criteria with values 0 or N.A. are not shown for this profile.
7)Criteria selection: Double-click to add the criteria to the Daily amount table for the selected country. Use the Search: field to search criteria according to their description.
8)Criteria assigned to the selected country and group.
Criterion: The criterion name
Criteria unit: A selection of the criterion unit from the drop-down list.
Alt. unit: An alternative criterion unit when only this criterion is to be shown normalized/standardized according to % or 100kcal or 100kJ. Not intended to be used with a 100kcal/kJ column setting.
Active: Show the criterion in Declaration.
Print: Include in reporting.
Rounding: A highlighted cell with letter i signals applied rounding blocks. Click on the field to display details.
Requirement unit: Recommended daily amount unit. This unit can differ from the default criteria unit. SpecPDM will automatically do the necessary recalculation.
ALGO <: Activate lower than alarm on recipe level for an value which was calculated by an algorithm.
Alarm value: Lower than value that triggers the alarm. Alarms are used for officially required GDA limits.
Alarm <%: Set the % that triggers the "lower than" alarm.
Alarm <: Activate the "lower than" alarm.
Warning value: The "lower than" value that triggers the warning. Warnings are used for internal purposes.
Warning <%: Set the % that triggers the "lower than" warning.
Warning <: Activate the "lower than" warning.
Requirement: The recommended daily amount value.
Warning >%: Set the % that triggers the "lower than" warning.
Warning Y: Activate the "lower than" warning.
Warning value: The "higher than" value that triggers the warning.
Alarm >%: Set the % that triggers the "higher than" alarm.
Alarm >: Activate the "higher than" alarm.
Alarm value: The ''higher than'' value that triggers the alarm.
ALGO >: Activate "higher than" algorithm alarm on recipe level.
9)Right-clicking the table opens a context menu with the following options:
Delete: Delete the selected line.
Move up: Move the selected line one place up.
Move down: Move the selected line one place down.
Rounding amount: Select a rounding block for rounding amounts in all serving sizes columns. For more information, see Administration → General → Products → Rounding Blocks.
Rounding reference value: Select a rounding block for rounding percentage (of the reference value) in all serving sizes columns. For more information, see Administration → General → Products → Rounding Blocks.
Edit columns: Show or hide columns. It is also possible to rename columns by double-clicking on their name.
10)Save: Save the changes.
Close: Close the dialog.
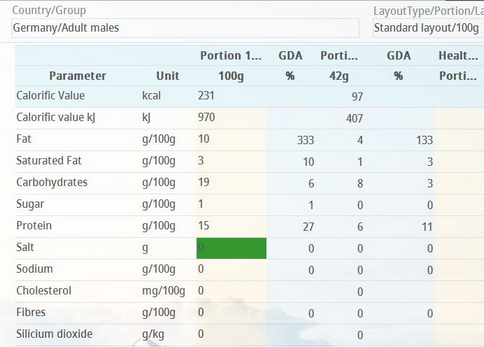
Example: In the image below, you can see two > alarms applied (for Fat and Carbohydrates) and one triggered (Fat). This is because the > alarm value of 5g/100g was exceeded for Fat while the value 30g/100g for carbohydrates was not.
|
Important: Always restart SpecPDM after enabling any alarm. |
Traffic light logic
The traffic light system represents a highlighting logic based on a user-defined range of values. For the description of the other parts of the screen, see the Daily amount section of this article.
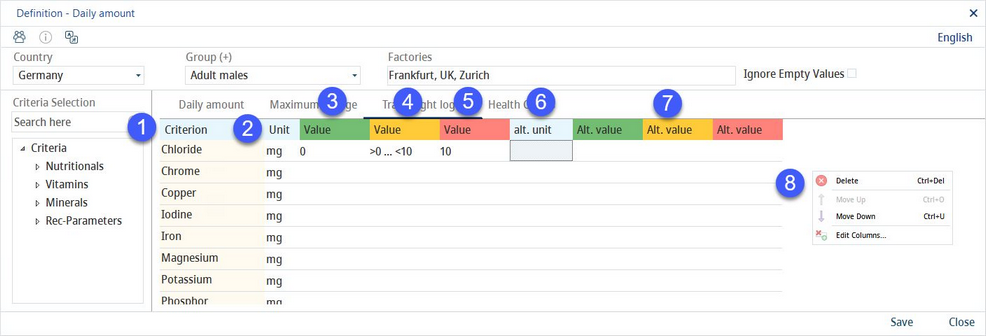
1)Criterion: The criterion name
2)Unit: A selection of the criterion unit from the drop-down list.
3)Value (green): The minimal (>) value.
4)Value (yellow): The range based on the green and yellow values. This field populates automatically.
5)Value (red): The maximal (<) value.
6)Alt. unit: An alternative criterion unit.
7)Alternative unit values.
8)Right-clicking the table opens a context menu with the following options:
Delete: Delete the selected line.
Move up: Move the selected line one place up.
Move down: Move the selected line one place down.
Edit columns: To show or hide columns. It is also possible to rename columns by double-clicking on their name.
Health Claims
Health claims are used to promote nutritional benefits. If the criterion value meets the condition configured in this tab, the health claim is displayed in column Heath claims. For the description of the other parts of the screen, see the Daily amount section of this article.
1)Criterion: The criterion name
2)Unit: A selection of the criterion unit from the drop-down list.
3)Value 1: The minimal (>) value.
4)Value 2: The range based on Values 1 and 3. The field populates automatically.
5)Value 3: The maximal (<) value. Both Values 1 and 3 must be entered otherwise a data error message displays.
6)Alt. unit: An alternative criterion unit.
7)Values 1, 2 and 3 for the alternative unit.
8)Text for value 1: Select from the list of health claims. The one that will appear is the one whose criterion value is lower than Value 1.
9)Text for value 2: Select from the list of health claims. The one that will appear is the one whose criterion value falls directly in the range (Value 2).
10)Text for value 3: Select from the list of health claims. The one that will appear is the one whose criterion value is higher than Value 3.
11)Right-clicking the table opens a context menu with the following options:
Delete: Delete the selected line.
Move up: Move the selected line one place up.
Move down: Move the selected line one place down.
Edit columns: To show or hide columns. It is also possible to rename columns by double-clicking on their name.
|
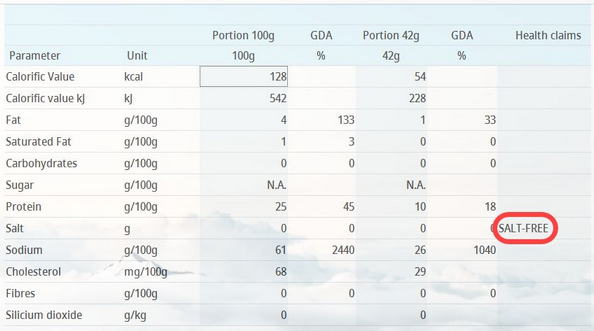
Example: A health claim displayed in the Declaration (the upper limit of fat content for the health claim Salt-free to be displayed was set to 0g/100g): |
Maximum dosage
The maximum dosage indicates how much from an e.g. flavoring mix can be used in a specific end product, without exceeding the maximum allowed limit.
Depending on the application, different max. dosages may be allowed. A matrix will be produced whose limit relates to the corresponding application. The values calculated using these predefined settings will be applied in Calculation/Maximum dosage and Declaration/Max. dosage. For the description of the other parts of the screen, see the Daily amount section of this article.
1)Criterion: The criterion name.
2)Unit: A selection of a criterion unit from a drop-down list.
3)Select relevant criteria from a selection list.
Creating, Editing, and Translating Groups
Nutritional criteria are assigned from the criteria selection list for each group per country. In order to assign the criteria, the groups have to be created first.
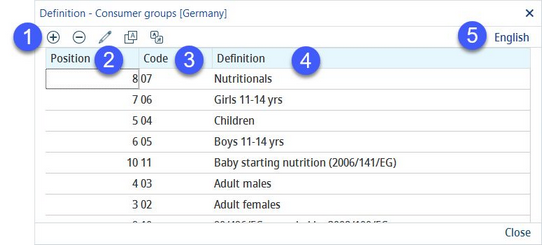
To create a new group, select a relevant country and click on the Group button.

A dialog with all groups available for the selected country displays.
1)+/-: Add or remove a group.
![]() : Edit a line.
: Edit a line.
![]() : Translate. See below.
: Translate. See below.
![]() : Select language.
: Select language.
2)Position: Position in the list of groups.
3)Code: Code of the group.
4)Definition: The group name.
5)Language: Select user language.
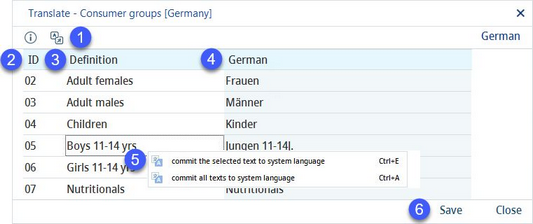
By clicking the Translate![]() button, you will open a new dialog that can be used to translate the texts that are listed.
button, you will open a new dialog that can be used to translate the texts that are listed.
1)![]() : Select the language to be translated.
: Select the language to be translated.
2)ID: The identification number.
3)Definition: The group name in the system language.
4)Group name in the target language.
5)Commit the selected text to system language: Right-click option; the selected target language text will be overwritten with the system language text. This option is available only in column Definition.
Commit all texts to system language: Right-click option; all target language texts will be overwritten with the system language texts.
6)Save: Save the changes.
Close: Close the dialog.
