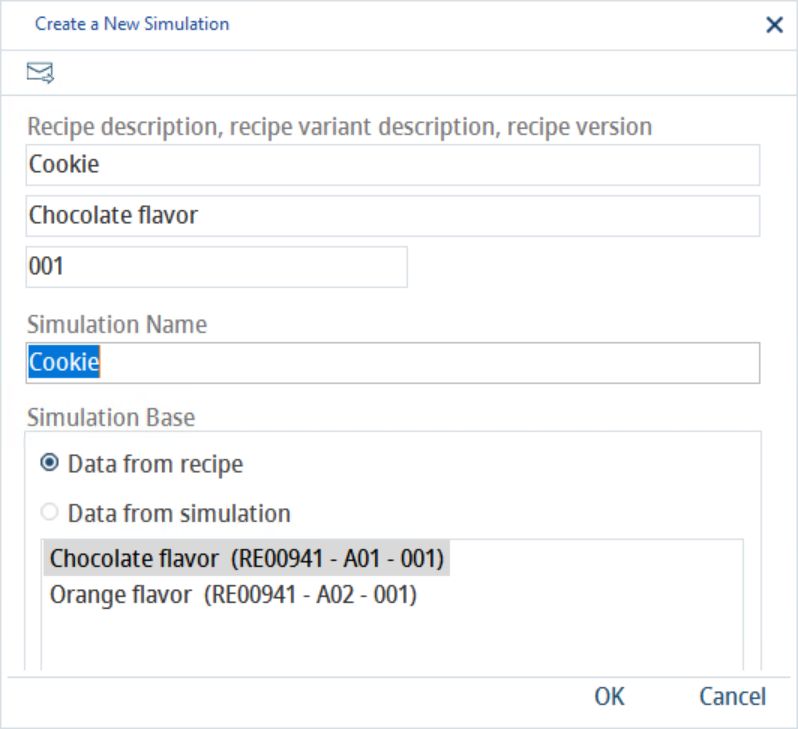
In the Selection tab of the Simulation module, simulations with their simulation varieties can be created, selected, and modified. They are based either on recipe varieties, or on already existing simulation varieties. Comparison data can be created for selected simulation varieties.
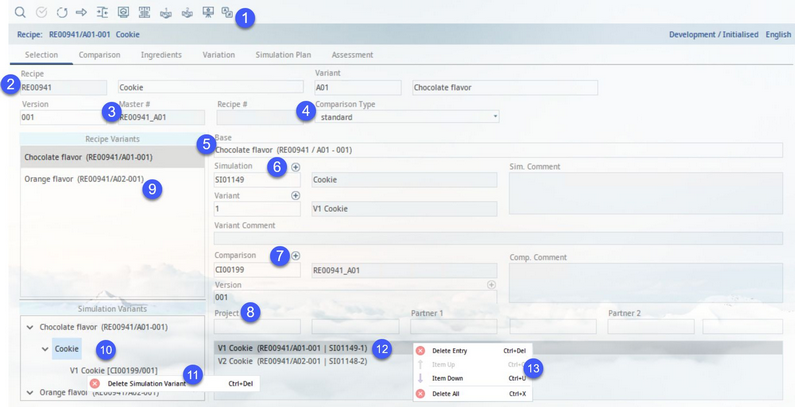
1)Module Toolbar:
Aside from the usual taskbar buttons referred to to in Simulation → Functions & Processes → Basic Simulation Functions, the Selection taskbar has different functions as follows:

1.Apply recipe: Use the recipe that is currently opened in the Recipe module for simulation.
2.Generate comparative data: Opens the Comparison tab in the module.
3.Simulation: Opens a selection dialog that allows you to load a preexisting simulation.
4.Comparison: Opens a selection dialog that allows you to choose from a list of preexisting simulation comparisons.
5.Partner 1 / Partner 2: Partner 1 and 2 selection. If the recipe used for simulation is linked to a project, this information will be automatically taken from fields Partner 1 and 2 in tab Project/Definition.
6.Project: Assign a project to the simulation.
2)The selected recipe, recipe variety, and version. Click on the magnifying glass or arrow button (labelled 1) to open the Select recipe dialog, where you can select a single recipe, multiple recipes, or multiple variants of the same recipe. These will then be used for simulation. For more information, see Simulation → Functions & Processes → Create a New Simulation.
|
Note: All forms of access restrictions, including recipe protection or missing access permissions, also apply to the Simulation module. In case you are not able to open a recipe in the Recipe module, you will not be able to select this recipe in the Simulation module either. |
3)Master no./Recipe no.: You can also select a recipe by entering the master/recipe number directly into the respective field (from Recipe → Definition).
4)Comparison type: Provides you with a selection list with possible modes:
Standard: A basic comparison overview.
Targeting: Also includes a targeting option.
Evaluation: Offers the option of applying evaluation criteria.
Nutritions: The GDA panel is visible (the same one as in targeting), but there is only one column per comparison. Values are compared against the first column and different values are marked by colors (green - higher value, red - smaller value). By holding the cursor over the parameters, you can see the absolute difference and also the difference in %. For this, original and non-rounded values are used. For final rounding, settings from criterion definition are used.
PL sheet: Compare criteria that contain any data in the first data column in Recipe → Definition → Production specifications (formerly PL sheet). Allows comparing numbers but also texts.
5)Base: Information of a recipe or simulation variety as a basis for copying.
6)Simulation: Click on the ![]() button in the toolbar to open an existing simulation, or press the blue + to create a new simulation.
button in the toolbar to open an existing simulation, or press the blue + to create a new simulation.

Set the number of simulation varieties to be created. Choose whether you want to take the data from the recipe (4) or simulation variants (8). Enter a name for the new simulation.
Variant: Press + to create a new simulation variant. Set the number of simulation varieties to be created. Enter a name for the new simulation. If multiple varieties have been selected for creation, SpecPDM will automatically create the variety names. You can modify them after.
S. comment: Insert simulation comment.
Var. comment: Insert simulation variety comment.
7)Comparison: Click on the ![]() button in the toolbar to open an existing simulation, or press the blue + to create a new comparison. You will be able to see all comparisons saved for your recipe under Recipe → Definition → tab Links. Double-click the comparison from this tab to open the linked comparison in Simulation/Comparison.
button in the toolbar to open an existing simulation, or press the blue + to create a new comparison. You will be able to see all comparisons saved for your recipe under Recipe → Definition → tab Links. Double-click the comparison from this tab to open the linked comparison in Simulation/Comparison.
Version: The control status of a comparison can be changed to Released. When the comparison is released, you can create a new release version by clicking on +.
Comp. comment: Insert a comment for the comparison.
8)Project: Assign a project to the simulation by clicking the ![]() button. The assigned project has to be already created via module Project. If a simulation is created on the basis of a recipe, the recipe project assignment is taken over. However, this can be overwritten. By double-clicking on the assigned project, you are forwarded to the Project module. The linked comparison will appear in tab Links in Project/Definition.
button. The assigned project has to be already created via module Project. If a simulation is created on the basis of a recipe, the recipe project assignment is taken over. However, this can be overwritten. By double-clicking on the assigned project, you are forwarded to the Project module. The linked comparison will appear in tab Links in Project/Definition.
Partner 1, Partner 2: The partners that have been specified in the module toolbar.
9)Recipe variants: All available combinations of the recipe's variants and release versions. Click on one of the variants to specify which variant should be used for the simulation.
10)Simulation varieties: All simulation varieties are displayed and arranged according to simulation and variety.
11)Use right-click option Delete simulation variety to remove the varieties.
12)Comparison varieties: Select simulation varieties for comparison by double-clicking on them in the Simulation varieties window (11). Moving up or down in this window influences the sorting of the simulation varieties in the Comparison tab (from top = left to bottom = right).
|
Note: This represents "an image" of the underlying recipe(s) taken at the moment the comparison is created. Updating the recipe(s) does not affect the already created comparisons and you would need to create a new comparison to reflect the changes. |
13)Use the right-click context menu to change the order or remove varieties.
