This dialog allows defining data objects to be used in the Inspection plan module. The dialog is divided into eight separate tabs - each tab represents a different type of object:
Test guidelines - This option is no longer used
Standard comment - This option is no longer used
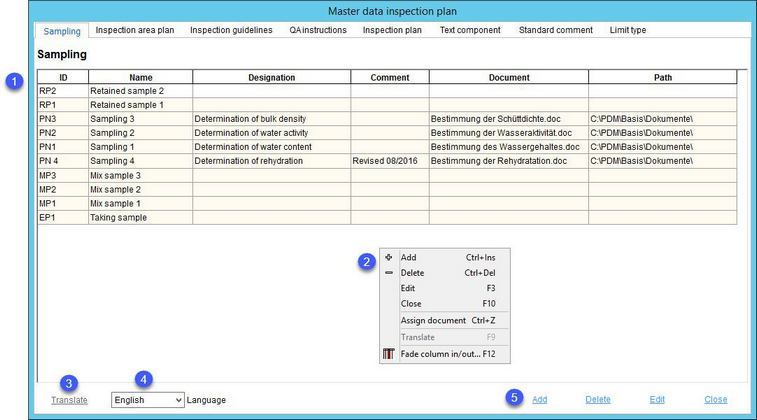
Sampling
Contains data objects to be used in Inspection plan/Inspection areas → drop-down list in column Sampling. Here you define the basic data for the physical-sample drawing. This information will appear later in SpecLIMS under the tab Sample. The goal is a systematic sample name and the fast, simple and structured creation of an inspection plan.
1.ID: The data object ID.
Name: The data object name.
Designation: The data object description or any other custom text.
Comment: A custom comment.
Document: The full name of the attachment assigned via right-click → Assign document.
Path: A directory structure showing path to the attachment.
2.Right-click opens a context menu with the following options:
Add: Insert a new line. This option is available only if the language selected in this dialog is also the system language.
Delete: Delete the selected line.
Edit: Edit the object.
Close: Close the dialog.
Assign document: Opens the standard Documents dialog, where an uploaded document can be selected. More information about attachments can be found in article General information/Managing Attachments.
Translate: Opens the Translate dialog in which object names can be translated to the selected language. This option is available only when the language selected in this dialog is not the system language.
Fade column in/out: Show or hide columns. It is also possible to rename columns by double-clicking their name.
3.Translate: Opens the Translate dialog in which object names can be translated to the selected language. This option is available only when the language selected in this dialog is not the system language.
4.Language: Select the user language or the language that you want to translate.
5.Add: Insert a new line. This option is available only if the language selected in this dialog is also the system language.
Delete: Delete the selected line.
Edit: Edit the object.
Close: Close the dialog.
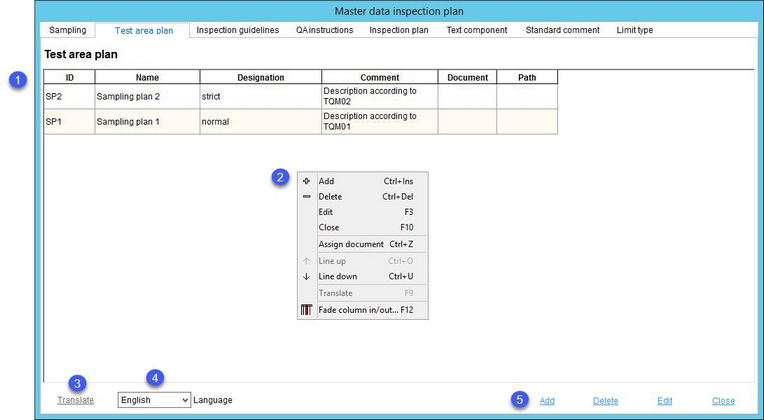
Test Area Plan
Contains data objects to be used in Inspection plan/Inspection areas → drop-down list in the column Inspection area plan. This information will appear later in SpecLIMS under the tab Sample. The goal is a systematic sample name and the fast, simple, and structured creation of an inspection plan.
1.ID: The data object ID.
Name: The data object name.
Designation: The data object description or any other custom text.
Comment: A custom comment.
Document: The full name of the attachment assigned via right-click → Assign document.
Path: A directory structure showing path to the attachment.
2.Right-clicking opens a context menu with the following options:
Add: Insert a new line. This option is available only if the language selected in this dialog is also the system language.
Delete: Delete the selected line.
Edit: Edit the object.
Close: Close the dialog.
Assign document: Opens the standard Documents dialog where an uploaded document can be selected. More information about attachments can be found in article General information/Managing Attachments.
Move row up: Move the row one place up.
Move row down: Move the row one place down.
Translate: Opens the Translate dialog in which object names can be translated to the selected language. This option is available only when the language selected in this dialog is not the system language.
Fade column in/out: To show or hide columns. It is also possible to rename columns by double-clicking on their name.
3.Translate: Opens the Translate dialog in which object names can be translated to the selected language. This option is available only when the language selected in this dialog is not the system language.
4.Language: Select the user language or the language that you want to translate.
5.Add: Insert a new line. This option is available only if the language selected in this dialog is also the system language.
Delete: Delete the selected line.
Edit: Edit the object.
Close: Close the dialog.
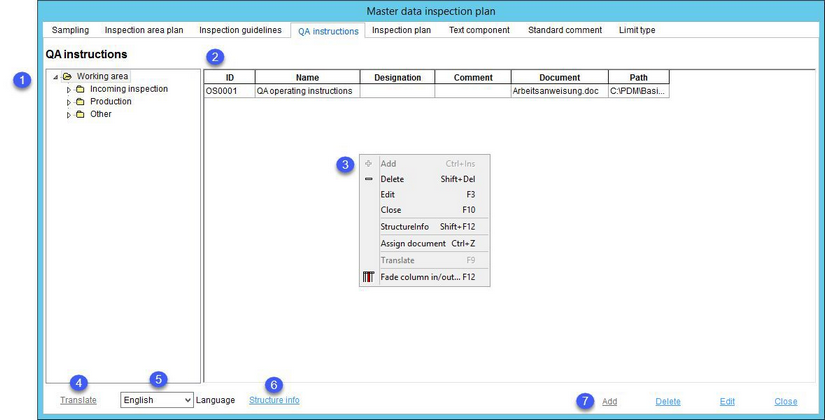
QA Instructions
Contains data objects to be used in Inspection plan/Definition → drop-down list in the column QA instructions. QA instructions and test plans have special significance for product types.
Overall, several test steps are required to manufacture a product for these product types. This means that one test structure must be defined within QA instructions, but a set of QA instructions can also be an element in a procedural description or a work plan.
One test location and test plan belong to each test step within a single workflow. At any given time, a sampling may be taken at the test location, according to a specific set of sampling specifications. In this way, sampling size can be defined in the sampling plan. The defined quality is stored in the test specifications as estimated values, limits, and methods, thereby directly linked to one or more samplings.
Since at any point in the testing process different test specifications can exist, the procedure for a testing point is defined in the test plan. These define the procedure, all specifications, and requirements from an initial sample to validating the results.
1.Working area: This structure can be defined via Administration/General/Work structure.
2.ID: The data object ID.
Name: The data object name.
Designation: The data object description or any other custom text.
Comment: A custom comment.
Document: The full name of the attachment assigned via right-click → Assign document.
Path: A directory structure showing path to the attachment.
3.Right-clicking opens a context menu with the following options:
Add: Insert a new line. This option is available only if the language selected in this dialog is also the system language.
Delete: Delete the selected line.
Edit: Edit the object.
Close: Close the dialog.
Structure info: When a row is selected, choosing this option expands its containing folder(s) in the Working area structure.
Assign document: Opens the standard Documents dialog, where an uploaded document can be selected. More information about attachments can be found in article General information/Managing Attachments.
Translate: Opens the Translate dialog in which object names can be translated to the selected language. This option is available only when the language selected in this dialog is not the system language.
Fade column in/out: Show or hide columns. It is also possible to rename columns by double-clicking on their name.
4.Translate: Opens the Translate dialog in which the object names can be translated to the selected language. This option is available only when the language selected in this dialog is not the system language.
5.Language: Select the user language or the language that you want to translate.
6.Structure info: When a row is selected, expands the containing folder(s) in the Working area structure.
7.Add: Insert a new line. This option is available only if the language selected in this dialog is also the system language.
Delete: Delete the selected line.
Edit: Edit the object.
Close: Close the dialog.
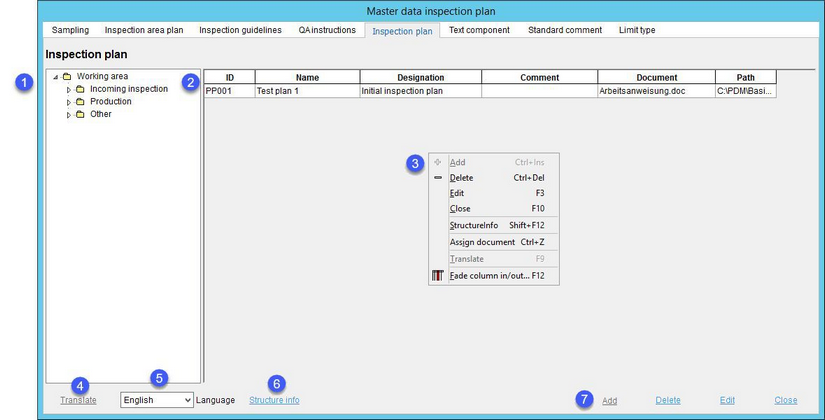
Inspection Plan
Contains data objects to be used in Inspection plan/Definition → drop-down list in the column Inspection plan. The sampling is stored in an inspection plan in the form of quantities, scope, methods, and times. (optional). This statement can be entered in the header data of any inspection plan and is used to standardize information and processes. You can store inspection plans for each QA statement. Since inspection plans can exist at an inspection point for a specific task (for example, line and stage inspection), the procedure for an inspection point is summarized in the inspection plan. This process indicates all the rules and conditions required by the sampling procedure.
1.Working area: This structure can be defined via Administration/General/Work structure.
2.ID: The data object ID.
Name: The data object name.
Designation: The data object description or any other custom text.
Comment: A custom comment.
Document: The full name of the attachment assigned via right-click → Assign document.
Path: A directory structure showing path to the attachment.
3.Right-clicking opens a context menu with the following options:
Add: Insert a new line. This option is available only if the language selected in this dialog is also the system language.
Delete: Delete the selected line.
Edit: Edit the object.
Close: Close the dialog.
Structure info: When a row is selected, choosing this option expands its containing folder(s) in the Working area structure.
Assign document: Opens the standard Documents dialog where an uploaded document can be selected. More information about attachments can be found in article General Information/Managing Attachments.
Translate: Opens the Translate dialog in which the object names can be translated to the selected language. This option is available only when the language selected in this dialog is not the system language.
Fade column in/out: To show or hide columns. It is also possible to rename columns by double-clicking on their name.
4.Translate: Opens the Translate dialog in which the object names can be translated to the selected language. This option is available only when the language selected in this dialog is not the system language.
5.Language: Select the user language or the language that you want to translate.
6.Structure info: When a row is selected, this expands the containing folder(s) in the Working area structure.
7.Add: Insert a new line. This option is available only if the language selected in this dialog is also the system language.
Delete: Delete the selected line.
Edit: Edit the object.
Close: Close the dialog.
Text component
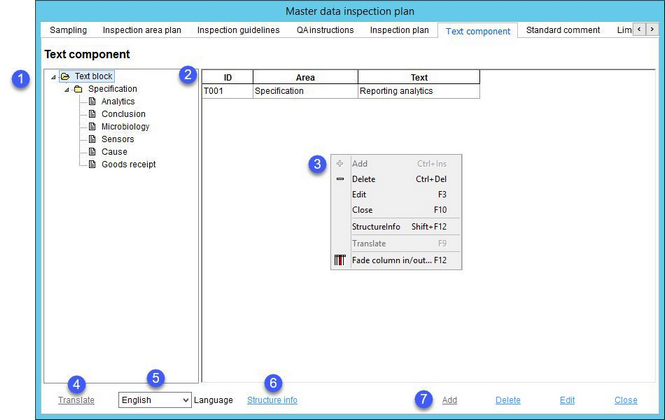
Text components can be used in Inspection plan/Inspection areas → Columns Comment 1 and Comment 2 via right-click → Text component.
1.Text structure: This structure can be defined via Administration/General/Group structure.
2.ID: The data object ID.
Area: For which area of SpecPDM that the text is relevant (e.g. allergens, vitamins, specification, etc.).
Text: Enter the text here.
3.Right-click opens a context menu with the following options:
Add: Insert a new line. This option is available only if the language selected in this dialog is also the system language.
Delete: Delete the selected line.
Edit: Edit the object.
Close: Close the dialog.
Structure info: When a row is selected, choosing this option expands its containing folder(s) in the Working area structure
Assign document: Opens the standard Documents dialog where an uploaded document can be selected. More information about attachments can be found in article General Information/Managing Attachments.
Translate: Opens the Translate dialog in which the texts can be translated to the selected language. This option is available only when the language selected in this dialog is not the system language.
Fade column in/out: Show or hide columns. It is also possible to rename columns by double-clicking on their name.
4.Translate: Opens the Translate dialog in which the texts can be translated to the selected language. This option is available only when the language selected in this dialog is not the system language.
5.Language: Select the user language or the language that you want to translate.
6.Structure info: When a row is selected, expands the containing folder(s) in the Working area structure.
7.Add: Insert a new line. This option is available only if the language selected in this dialog is also the system language.
Delete: Delete the selected line.
Edit: Edit the object.
Close: Close the dialog.
Limit Type
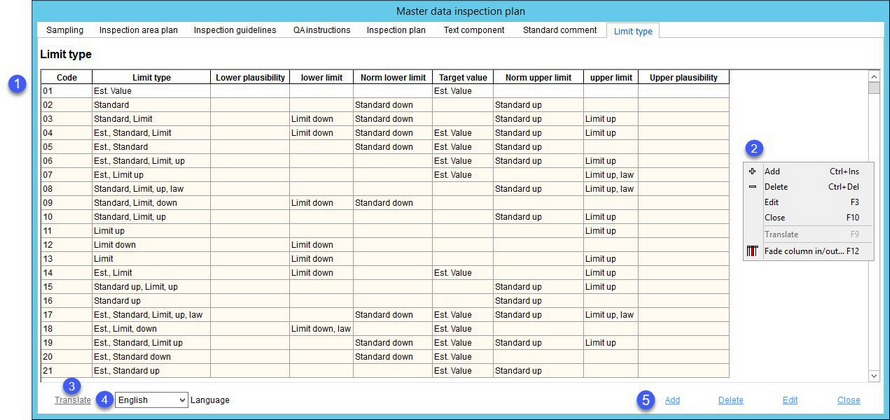
Limit value types are used to describe different uses of marginal areas that can be assigned via Inspection plan/Criteria. The limit type specifies which limit values are to be evaluated. The limit type can already be assigned when the criterion is created. The limit values are defined when the inspection plan is created. In LIMS, the results are classified according to the limit values. The limit value types are system definitions so these should not be changed by the user.
1.Limit types: The limit types are custom text fields. When the field is left blank, the option will become inactive in Inspection plan/Criteria. Text entered in the field is only informative and is not used outside of the Administration module.
2.Right-clicking opens a context menu with the following options:
Add: Insert a new line. This option is available only if the language selected in this dialog is also the system language.
Delete: Delete the selected line.
Edit: Edit the object.
Close: Close the dialog.
Translate: Opens the Translate dialog in which the texts can be translated to the selected language. This option is available only when the language selected in this dialog is not the system language.
Fade column in/out: To show or hide columns. It is also possible to rename columns by double-clicking on their name.
3.Translate: Opens the Translate dialog in which the texts can be translated to the selected language. This option is available only when the language selected in this dialog is not the system language.
4.Language: Select the user language or the language that you want to translate.
5.Add: Insert a new line. This option is available only if the language selected in this dialog is also the system language.
Delete: Delete the selected line.
Edit: Edit the object.
Close: Close the dialog.
