|
Important: There is currently a more effective way of creating a project from a template directly in the Project module, therefore, it is not necessary to use templates defined in Administration anymore. See Project/Functions & Processes/Create a new project for more information. |
The project template is a predefined set of stages, activities, resources, and checklist items that can be used in the Project module. Each template is linked to a specific combination of Project type and Project group. When a new project is created using the same combination of type and group, the template will be applied. Using these templates eliminates the necessity to add all project objects manually.
Project templates can also be added on top of existing projects. To do so, go to Project/Activities and click on the Project templates icon ![]() from the quick access toolbar. Select a template from the list of project templates created in the dialog, and the items from the template will be added to the project.
from the quick access toolbar. Select a template from the list of project templates created in the dialog, and the items from the template will be added to the project.
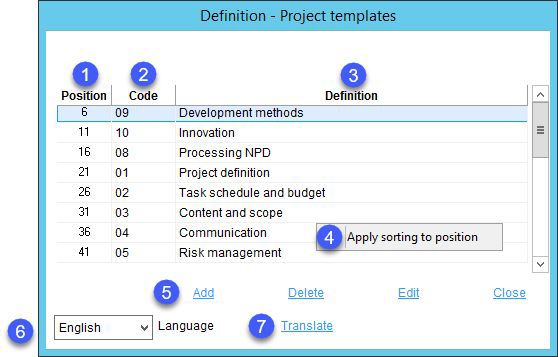
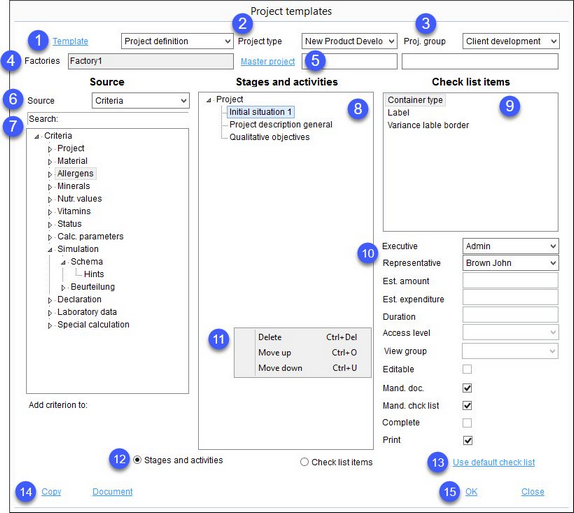
1.Template: Opens dialog Definition - Project templates in which project templates can be created, modified, and translated.

1)Position: The position in the list of project templates.
2)Code: The project template identification code.
3)Definition: The project template name.
4)Apply sorting to position: Right-click option; applies the standard sorting logic (series of numbers with the common difference of 5).
5)Add: Insert a new project template (enabled only in the system language).
Delete: Delete the existing project template (enabled only in the system language).
Edit: Modify the existing project template.
Close: Close the dialog.
6)Language: Select the user language.
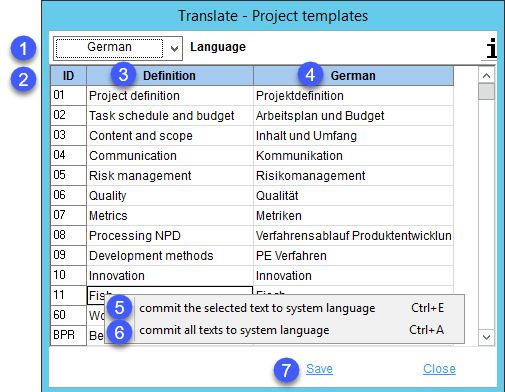
7)Translate: Opens dialog Translate - Project templates.

1)Language: The language to be translated.
2)ID: The identification code.
3)Definition: The project template name in the system language.
4)Project template name in the system language.
5)Commit the selected text to system language: Right-click option; the selected target language text will be overwritten with the system language text. This option is available only in column Definition.
6)Commit all texts to system language: Right-click option; all target language texts will be overwritten with the system language texts.
7)Save: Save the changes.
Close: Close the dialog.
2.Project type: Select a project type from the list of project types defined in Administration/General/Project type/group.
3.Proj. group: Select a project group from the list of project groups defined in Administration/General/Project type/group.
4.Factories: Click in the field to assign relevant factories. By default, all factories are assigned to all templates. In case you create a new project, project types and groups are shown only for already assigned factories. When there is no assigned factory, all types and groups are shown.
5.Master project: This button is obsolete. Any project can be used as a master project and its data adopted to the newly created projects. The user just needs to select the option Master project when creating a new project in the Project module.
6.Source: Switch between criteria and resources.
7.Criteria/Resources: Criteria can be defined via Administration/General/Criteria structure. Resources via Administration/General/Person. Double-click on a criterion/resource to add it to the list of Stages and activities or Check-list items (depending on the selected radio button [12]). The criterion/resource will be assigned, based on what object you select in section Stages and activities (8).
8.Stages and activities: Compose an activity structure to be used in the Project module. Select Project to insert a stage; select a stage to assign it an activity; select an activity to assign a resource to it. See the scheme below:

9.Check list items: Manage checklists linked to individual stages, activities, or resources. These checklists are used in Project/Deliverable. Before adding a checklist item, make sure the Check-list items radio button (12) is selected. Use the Stages and activities section to select the stage, activity, or resource to assign checklist items to, and double click on the criteria you want to include on the list from the Criteria/Resources section (7).
10.Executive: The person in charge can be assigned to every stage and activity. The list of available resources can be managed via Administration/General/Person.
Representative: The deputy can be assigned to every stage and activity. The list of available resources can be managed via Administration/General/Person.
Est. amount: The activity or stage-related cost used in Project/Activities.
Est. expenditure: The activity or stage-related estimated effort used in Project/Activities.
Duration: The duration of the stage/activity from the selected start date. It is used in Project/Activities.
Access level: Available only for checklist items. The Access permission column is present in Project/Deliverable. Checklist access permission groups can be created via Administration/General/Access permission for check-lists. Access to items belonging to a respective group can be granted via Administration/Access level → Operating elements → Access permission for check-lists.
View group: Available only for checklist items. The View group checklist is located in Project/Deliverable and can be used to filter checklist items.
Editable: When a pre-activity is assigned to an activity via right-click option Specify pre-activity in Project/Activities, the activity becomes non-editable. This checkbox enables editing activities even though they have pre-activities assigned to them.
Mand. doc.: Attaching a document to the object becomes mandatory. The Document field for this object will be highlighted accordingly.
Mand. chck. list: Checklist items associated with the object become mandatory. The objects will be highlighted accordingly in Project/Deliverable.
Complete: Mark the document as complete (right-click option in Project/Activities).
Print: The object will be selected for reporting by default. This can be changed manually in the Project module (checkbox P), or directly, when configuring a report.
11.Right-click context menu that is available in the Stages and activities and Check-list items sections.
Delete: Delete item.
Move up: Move item one place up.
Move down: Move item one place down.
12.Use these radio buttons to select a section to which criteria/resources will be assigned from the Criteria/Resources section (7).
13.Use default check list: Fills the Check-list items section with default checklist items. You can learn how to create default checklist items in article Administration/General/Default checklist entries.
14.Copy: Adopt the content of another template.
Document: Upload attachment that will be used only within this dialog.
15.OK: Accept changes.
Close: Close the dialog.
