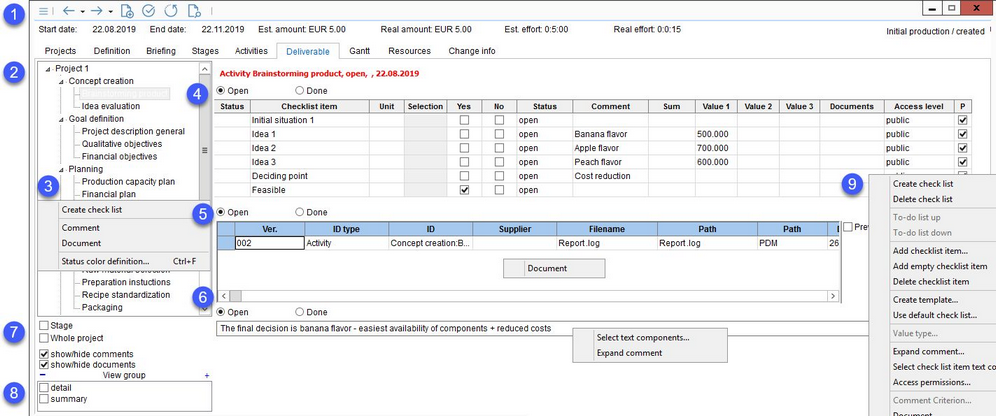
In this tab, you can assign project stages/activities and resources to the following objects:
•Checklist
•Comment
•Document
The section is connected to section Briefing/Definition.
1.Quick Access Toolbar: For more information, see Project/Functions & Processes/Basic Project Functions.
2.Project overview: Contains all stages/activities/resources. Click on an object to display deliverables on the right side. The display can be customized using various filters (see 7, 8).
3.Right-click on stage/activity/resource to display the context menu. The options vary according to the object type:
Create checklist: Insert an empty checklist.
Comment: Insert a comment.
Document: Insert a document window where documents can be assigned in the standard SpecPDM manner.
Status color definition: Apply different font colors on the overview window (1) to see which objects contain opened checklist, which closed checklist and which do not contain any checklist.
4.Checklist: Contains the following columns:
Open/Done: Indicates if the checklist is complete or open.
Status: Select whether the project is marked as Done or Open. Project can be set to Done only if all the mandatory fields contain information.
Checklist item: The name of the checklist item.
Unit: The unit, as defined in the criteria structure → field Unit.
Selection: A selection list, as assigned in the criteria structure → field Selection list.
Yes/No: Yes/No checkboxes.
Status: The status of the checklist item. When the item is marked as Done, a check mark appears in the very first column called also Status.
Comment: A custom user comment.
Sum: Result of the Values 1 - 24. The calculation is done according to the setting in Administration/General/Criteria structure → field Formula.
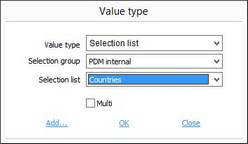
Value 1 - 24: Criterion values. Up to 24 values can be activated via right-click → Fade column in/out. You can also insert a selection list or checkbox by right-clicking → Value type. These values can be calculated using algorithms. See Administration/General/Algorithms → Using algorithms in checklists for more information.
Documents: The attached files. When a document is mandatory, the field becomes highlighted.
Access permissions: You can select access permissions via right-click → Access permissions. To define which permission groups will be able to access public via Administration/Access level → navigate to Operating elements/Access permission for check-lists and select which groups will be able to view and/or access public and which confidential checklist items.
P: If marked, the entry will be included for reporting.
5.Document: The field contains basic information about all attached files. Use right-click → Document to use SpecPDM standard file upload options. See General information/Managing Attachments for more information.
6.Comment: You can type a custom comment to the comment field. Buttons Open/Done indicate whether the comment is considered opened or closed. Use right-click to display a context menu with the following options:
Select text components: Insert a predefined text component. See article General information/Using Text Components for more information.
Expand comment: Use expanded view to type the component.
7.Filters: By applying these filters, the user can choose which results are to be displayed. These settings are retained after saving. The filtering options are:
Stage: All results related to the active stage are displayed (e.g. if a resource is selected in the overview tree diagram, the result of the entire stage, to which this resource belongs, is displayed).
Whole project: All results of the entire project will be displayed, regardless of which object is activated in the overview.
Show/hide comments: Enable or disable comments. The Comment right-click option will become inactive.
Show/hide documents: Enable or disable documents. The Document right-click option will become inactive.
8.View group details: All checklists with View group Details will be displayed.
View group summary: All checklists with View group Summary will be displayed.
9.Right-clicking in the checklist opens the following context menu:
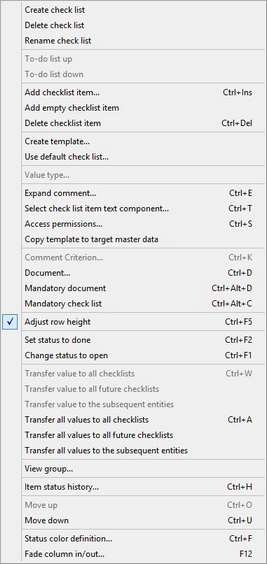
•Create checklist: Add another empty checklist.
•Delete checklist: Delete the checklist.
•Rename checklist: Change the name of the checklist.
•To-do list up/down: Move the checklist one place up or down (in case you added more than just one checklist).
•Add checklist item: Fill the checklist with items. These are criteria from Administration/General/Criteria structure.
•Add empty checklist item: Adds an empty checklist line with no criterion specified.
•Delete checklist item: Remove the selected checklist item.
•Create template: Make the selected checklist into a default checklist. Selecting one of the checklists from the drop-down list will overwrite all its items associated via Administration/General/Default checklist entries with the currently added items. Click Add to create a new default checklist.
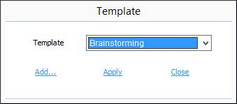
•Use default checklist: Adds items from a selected checklist created via Administration/General/Default checklist entries. This way you can standardize checklists you use regularly and insert all checklist items at once.
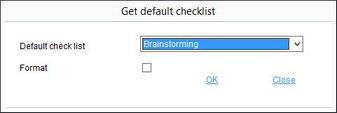
In SpecPDM, you can rename columns using the Fade column in/out right-click option. Select the Format checkbox if you want to adopt the names of columns from the default checklist. Leave the checkbox unselected if you want to keep the standard column names.
•Value type: Specify the type of the entry in one of the fields Value 1 - 24.
•Expand comment: Open the cell content in an expanded view.
•Select checklist item text component: Insert a text component in the field Comment. See article General information/Using Text Components for more information.
•Access permissions: Set the access permission for the checklist item.
•Copy template to target Master data: Criteria can be copied between Master data/Attributes and Project/Briefing. Use this function to open the Master data selection dialog. Select a copy template (Administration/General/Templates Manager → template type Copy Check List <-> Master Data) and data language. Then select the Master data object where the criteria will be copied and click Apply. The criteria will be copied to the selected object. You can use a designated program parameter to verify whether the criterion already exists in the target Master data object.
•Comment criterion: A different color used for criteria description means that a criteria comment is present in the criteria structure → field Comment and can be viewed using this option.
•Document: Add an attachment.
•Mandatory document: Make an attachment mandatory for the selected checklist item.
•Mandatory checklist: Make the selected checklist item mandatory. It will become highlighted.
•Adjust row height: If selected, the row's height will adjust according to the volume of the text.
•Set status to done/Change status to open: Change the item's status.
•Transfer value...: If you use more than one checklist with the same checklist item, you can use one of the available options to copy the value.
•View group: A filter that will be applicable in tab Project/Deliverable.
•Item status history: An overview of the item's status changes.
•Move up/down: Move criterion one place up/down.
•Status color definition: Adjust the highlighting colors.
•Fade column in/out: Show or hide columns. It is also possible to rename columns by double-clicking on their name.
|
Note: You may not be able to select checklist criteria from all the normally available criteria groups. Your SpecPDM administrator may use a designated program parameter to select specific criteria groups to be available in the Project module. |
