Master data may include one or more partners, and if they do not match, a producer can also be assigned. Any number of (unique) suppliers, including producers, can be added for the same object. Product data provided by the suppliers are then managed in the other Master data tabs.
There is always one internal specification present that is used for collecting data from the other suppliers. Data from this zero supplier will be applied once the Master data object is used as a recipe component. For more information, see Master data → Functions & Processes → Copy Supplier Data.
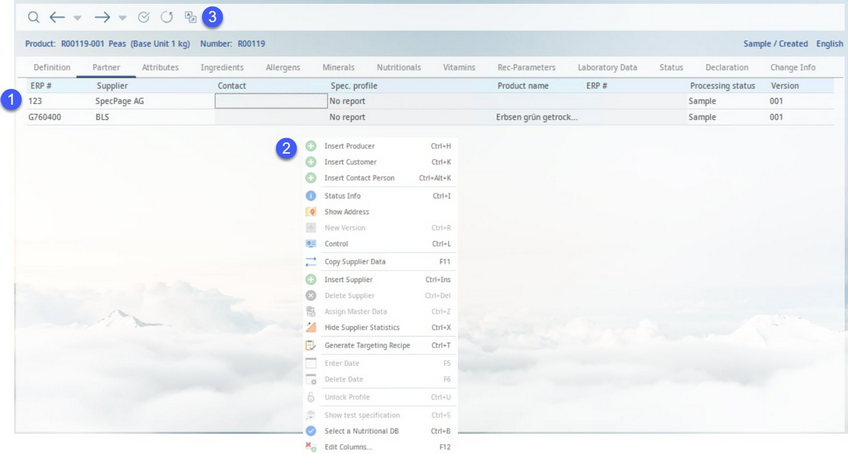
1.Suppliers (including the zero supplier). The following fields are available:
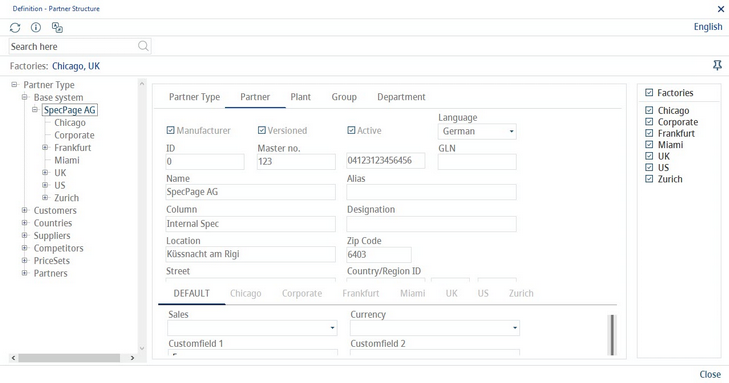
ERP. no.: The internal number of the supplier record from Administration → General → System Settings → Partner structure.
Supplier: The name of the supplier.
Contact: The assigned contact person. The contact is linked to the supplier. Contact persons can be created for individual partners via Administration → General → System Settings → Person. A default contact person can be selected using a designated program parameter.
Spec. profile: The specification profile used for reporting. This is the default profile which will automatically be invoked from the WebReporting tool. Behavior of this selection list can be further specified during program installation. The default reporting profile in SpecPDM can either be the last one used by the user, or the one selected in this column.
Product name: The recipe name or Recipe variety name. It can be assigned automatically but also filled in manually. This field is used for example when working with nutrient databases.
ERP number: The manually inserted ERP number. This may be the reference ID from the supplier.
Processing status, Status of finding, Date of finding, Finding release, Person responsible: Refers to the control dialog of the supplier record.
Manufacturer: Identical to supplier by default. Suppliers can have one or more manufacturers (production sites or broker scenario).
Customers: The assigned customers.
Supplier state: The supplier status. Define the actual status of individual suppliers. The user can opt for ancillary or main supplier, the main supplier is highlighted blue.
Released: Indicates whether supplier was released (zero partner is always released).
Portal: The checkbox should be selected if a portal (Supplier's Guide) supplier exists.
Template: Select an existing portal template to connect to Supplier's Guide. See Administration → General → System Settings → Templates Manager for more information.
Owner: Use the dropdown list to select a company that is responsible for the material that is used by different factories. Only one company can be chosen for each supplier - this company, or "owner," is the umbrella company which the individual factories fall under. In conjunction with the Supplier's Guide, the company assigned to this column can be uploaded to the Supplier's Guide as the sole issuer of that specification.
Origin, Date, Person: The linked source record from Recipe assignment. Date and person refers to last "commit to Master data" performed.
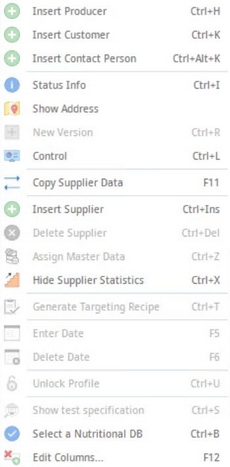
2.A right-click in the Partner tab opens a context menu with the following options:
Insert producer: Opens the Select manufacturer dialog. For more information see Assign supplier - Insert producer.
Insert customer: Opens the Select customer dialog. For more information see Assign supplier - Insert customer.
Insert contact person: Opens the Definition - person dialog. For more information see Assign supplier - Insert contact person.
Status Info: Opens the Status overview dialog. This dialog contains all change information for the selected supplier
Show address: Opens the Administration → General → System Settings → Partner structure dialog with the contact details of the supplier. An appropriate department must be selected, otherwise the entry will not be displayed.
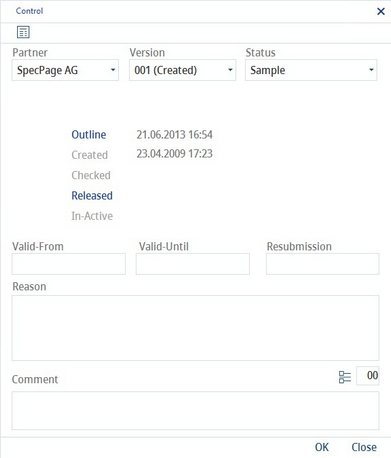
New version: Here, a new supplier version can be created. Using the version # button in the Definition tab, you create a new version of the object only for the zero partner. For other partners, use the following procedure: Use the Control dialog (see the following image) and select the specific Partner to create the new version for. Then use the control status to release the object (new version can be created only for objects with statuses Released and Inactive). Then back in the Partner tab right-click on the partner to open the context menu and select New version.
Control: Control of supplier version. For more information, see General Information → Data/documents control.
Copy supplier data: Enables transferring the selected type of Master data from one supplier to another. For instructions on how to use this function, please See Master data → Functions & Processes → Copy Supplier Data.
Insert supplier: Opens the Select supplier dialog. For more information, see Assign supplier.
Delete supplier: Deletes the selected supplier with all their Master data. The following warning message will appear:
Delete supplier version: A supplier version can be deleted if there is more than one version and is in an active state (released, inactivated, reactivated).
Assign Master Data: Opens the Allocation supplier - material dialog. Here, a product structure can be associated with the supplier.
Hide supplier statistics: Suppliers with statuses defined in this dialog will not be displayed.
Generate targeting recipe: Quickly create a recipe from the Master data. Opens the Recipe → Definition dialog with all the data prefilled.
More information can be found in the Recipe section.
Enter date: Works only if you right-click the Processing date column. A processing date can be specified for each supplier.
Delete date: Deletes the processing date.
Unlock profile: Works only in the Spec. profile column. Enables the selection of a specification profile for already released supplier.
Show test specifications: Opens the Specification dialog if an inspection plan specification is available.
Select a Nutritional DB: See Master data → Functions & Processes → Assign Nutrient Database.
Edit columns: To show or hide columns. It is also possible to rename columns by double-clicking their name.
3.Module Toolbar: For more information, see Master data → Functions & Processes → Basic Master data Functions.


