Via Definition, users can open existing or create new Master data objects, and capture basic data. Subsequently, these Master data records can be used in recipes. A Master data object may have two different levels of indetification:
•Master data: Identified by a Master data number (ID).
•Release: Identified by a release version number.
To create a new Master data object, it is necessary to fill out:
•Name
•Product structure (type/area/group)
•Factory
A Master data object can be further specified by:
•Department: This field can be activated/deactivated in all sections of SpecPDM by the system administrator.
•Product Line: This field can be activated/deactivated in all sections of SpecPDM by the system administrator.
•Master number: An internal or external identification number (ERP, SAP, etc.).
•Recipe number: A recipe number of the recipe that was committed to Master data via assignments (finished product).
Each Master data object can be used in one or more recipes. A Master data object usually contains various additional data such as attributes, prices, mineral content, nutritional values, allergen information, etc. All additional data necessary for the creation of a comprehensive specification has to be defined and made available in the system. Each parameter stored for the material or ingredient is automatically transferred into the recipe when the components are assigned, and can be visible in the Calculation tab of the recipe.
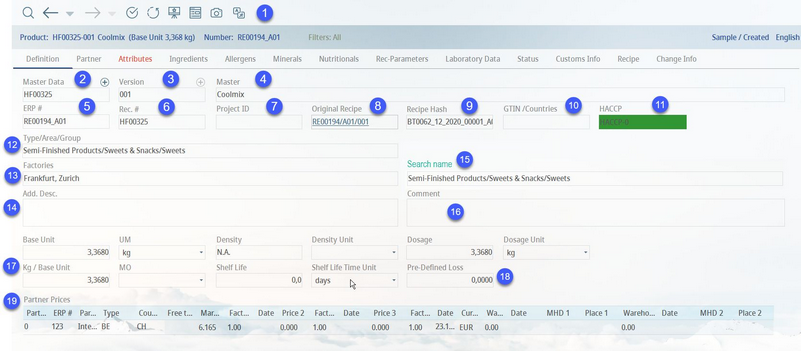
1)Module Toolbar: For more information, see Master data → Functions & Processes → Basic Master data Functions.
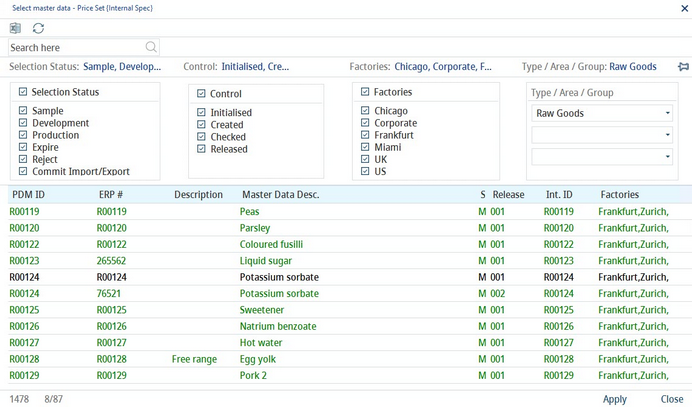
2)Master data: This field contains the Master data number which is the main ID used in SpecPDM for identification of Master data objects. The + button is used to create new Master data. The magnifiying glass icon in the taskbar opens the Select Master data dialog, where it is possible to filter and open an existing Master data object.
A Master data object can be deleted completely or have all its data cleared (it will be possible to open the object later) by right-clicking the blue Master data button. It is not possible to delete Master data objects that are already used in recipes. The user has to open the recipe(s) and remove the object before deleting the Master data entry. It is also not possible to delete an object if there is a test specification for the corresponding material.
3)Version: Via +, the user can create a new release version, provided the relevant material has been released (i.e. its control status is set to released or inactive). Right-click the text Version and select Delete version to delete the selected release version. When you enter a release version number in the field and confirm by pressing Enter, SpecPDM will try to load the relevant release version. If such version does not exist, an information will display.
4)Master data description: Enter Master data description (name). Use right-click to open the context menu:
Edit/Translate/Alternative: The Master data object's main and additional description can be translated into a different language. You can also provide an alternative name that will be used depending on the user's region (not language). For more information see chapter Master data → Functions & Processes → Translate Material Name and Define Alternative Material Names.
Fix search name: Copies the Master data name to the Search name field (see 15). The search name will be checked for its uniqueness and then locked for any future changes. When there is a material with the same search name, a notification is displayed and it is not possible to save the object unless a unique name is entered.
5)ERP no.: The custom identification number. It can be overwritten by a third-party material number (e.g. from SAP). It is allowed to change the number of a released material.
6)Rec. #.: When a recipe is assigned to Master data, the recipe number is inserted automatically (for finished products). For other types of Master data, an ID is entered automatically (like an ERP no.). The original recipe shows the recipe number if finished products are created via recipe assignment.
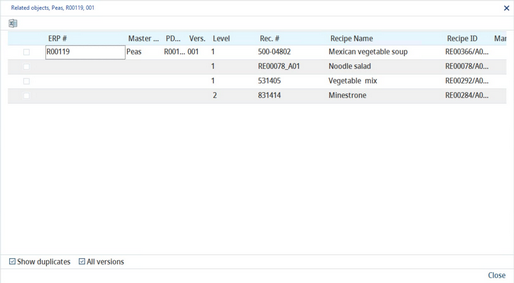
7)Project ID: By right-clicking Project ID, the user can view the list of projects linked to relevant Master data. This button is also accessible with read-only rights. In this case, users can also view linked projects; however, they are not allowed to modify them. Here, for example, is the list of recipes related to the Master data.
8)Original recipe: Master data objects can be created from recipes using the Commit to Master data function which is designed to create finished product records from recipes. In this case, the original recipe's ID displays in this field. You can double click on the number to display the recipe.
9)Recipe Hash: This is a special code automatically generated for the original recipe (see the previous point). For more information, see Recipe → Definition.
10)GTIN/Countries (Global Trade Identification Number). Use right-click, select Change, and enter the GTIN number. Then click in the right field to open the GTIN regions dialog. Select all applicable regions. This feature can be enabled/disabled by the system administrator using a designated program parameter.
11)HACCP: A hazard Analysis and Critical Control Points rating. The rating comes from the HACCP dialog available form tab Attributes.
12)Product structure:
Type: Type mapping from product type definition. Once the type is selected and Master data saved, it cannot be changed.
Area: Area mapping from product area definition.
Group: Group mapping from product group definition.
13)Factories: Assignment of factories and their facilities. Both can be defined in Administration → General → System Settings → Partner structure. Factories can be assigned by right-clicking → Assign factories. Right-click on the factory from the Assign factory dialog and select Facilities to select individual facilities. Facilities will appear in square brackets next to the department to which they belong.
Department and Product range (line): The lists of departments and product ranges defined in Administration → General → Products → Dept. / Prod. line. These options are hidden by default and may be enabled only by the system administrator using certain program parameters.
14)Add. description: Description of the Master data object.
15)Search name: A unique name that can be searched using the F4 key search function. The field can have up to 40 characters. It can be enabled and the number of characters specified using a designated program parameter.
16)Comment: Object-related comment. The user may edit the comment section directly. Right-click in this field and select Text search to perform a search in the comments of all Master data objects. Enter the search term (use * to search for partial keywords), apply filters (status, department, product structure, and control status), and use Refresh. Results can then be exported to a directory or an Excel file. Clicking Apply will add the selected comment to the material.
Search: Enter the search keyword or its part with *.
Selection status: The processing status (can be enabled per user need)
Selection of Department/Factory (optional).
Selection of Type/Area/Group (optional).
Control: The object control status (optional)
Object: The objects (materials) that contain the corresponding text. Double-clicking opens the selected object.
Hit: The number of eligible objects.
Export: Transfers data into report.
Excel: Transfers data into Excel.
Refresh: Refreshes search results.
Apply: Adopt the object line in text.
17)Base unit: Specific the quantity of the product. Partner prices are defined for this quantity.
SU: The storage unit selection.
Density: The material density including unit.
kg/base unit: The base quantity corresponding to unit (e.g. kg). It is calculated from base unit, storage unit and density.
MO: Used to assign material overheads cost group that can be defined in Administration → General → Costing Settings → Overhead cost groups.
BBD: The best before date together with unit.
18)Dosage: The typical dosage of the Master data object with appropriate unit. Dosage values are copied from recipe to Master data if Master data are created or updated by declaration automatic, or manually by committing recipe data to Master data from an assignment. The user can set permissions for the dosage label and dosage unit combo box in Administration/Access permissions/Operating elements/Master data/Edit fields/Dosage.
Predefined loss: Each Master data object can have a predefined loss assigned (in %). This loss is displayed in Recipe → Recipe → column Pre-def. loss automatically and raises the costs.
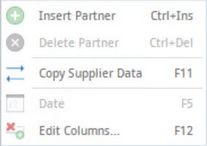
19)Partner prices (Price sets): With a right-click, the user can Insert a partner and specify the corresponding prices 1-3 (shopping, plan, and sliding price) including dates and price factors. Also, two storage quantities (warehouse 1 and 2) with date can be entered. Prices are related to the base unit (14). Registered suppliers can be deleted by right-clicking in the Partner prices section and selecting Delete partner.
|
Note: Assigning the internal partner is relevant to the recipe calculation, because it is used when taking data into a recipe. Price sets are also assigned. When adding a new price set, the defined price/price target is automatically inserted; i.e. for new price partners (price sets), the value of a particular program parameter is evaluated. The value is inserted into the price columns. The currency selected by the user is used. Once a user with price set XY creates a new material, in addition to the standard price set 0, the price set XY will also be added |
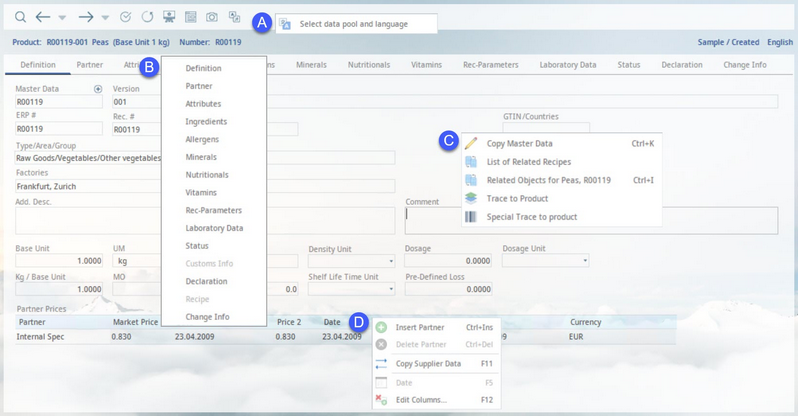
The following right-click menus are available for the Definition tab:
A)Select data pool and language: To display this menu, right-click on the blank space above the tabs (Attributes, Vitamins, etc.). Select the data pool for the specific target market. You can also select the language of the exported file. The selected data pool will display on the left side next to Filters:.
B)Tracking changes: To display this menu, right-click on one of the tabs. Track changes between release versions.
C)Context menu: To display this menu, right-click on the blank space in this window. See the description of its individual options below.
D)Partner prices menu: To display this menu, right-click in the Partner prices table. See the description of its individual options below.
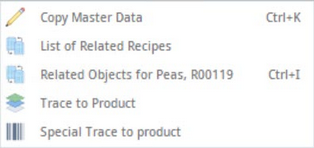
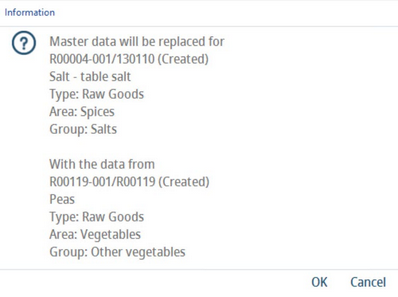
Copy Master data: Via Select Master data, the user can select an existing Master data object, and its data will be overwritten with the data from the currently opened object. An information dialog opens:
List of related recipes: Displays all recipes in which the selected object is used.
1)Search: Enter the search keyword or its part with *.
2)Filters: Use the processing status, control status, and factory filters to limit the results.
3)Recipe definition data with which the object is connected.
4)Right-click → Status color properties to open the status color definition list. Fade column in/out to select which columns will be displayed.
5)Apply: Open the selected recipe.
Close: Close the dialog.
6)Excel: Export to Excel and compatible programs.
Refresh: Refresh the displayed results (e.g. after applying filters).
Export: Transfers data into report.
List of related objects: This option is available only when the Master data object is a supplier (type = supplier). Displays a list of all Master data objects where the selected supplier is used.
Related objects: All Recipe → sub-recipes and varieties where the selected object is contained are displayed. Use right-click and select Fade column in/out to specify which data (columns) will be displayed. Results can be exported to Excel. The dialog contains two checkboxes that can be used to customize the view:
All versions: When selected, all release versions of each recipe is displayed. When not selected, only the latest release version is displayed.
Show duplicates: When this checkbox is selected, identical sub-recipes are included in the list together with information about the level (level 1 represents the main recipe, other levels are sub-recipes and the sub-recipe on the lowest level contains the Master data object).
Trace to product: Trace the presence of raw materials in finished or semi-finished product types displaying a list with any Master data containing the selected material on every individual level. This kind of search might be useful to have a solid overview of which finished or semi-finished products are affected by a change in the selected raw material. By double clicking the selected Master data or clicking the button Apply, the Master data object is opened. The search results can be exported to Excel.
VG trace to product: This function is the same as the previous one but with an extra column Communication which contains data from a special Communication criterion. The data can be provided in Master data/Attributes. This feature was designed to meet a specific client's needs.
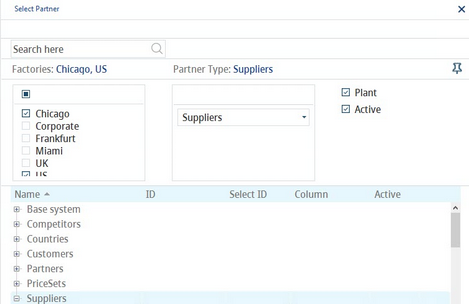
Insert partner: Here, a supplier or a price set can be selected and assigned. It is possible to use two checkboxes to further narrow the results: Operation to include partners defined as plants, and Active to show only active partners/plants. Both can be defined via Administration → General → System Settings → Partner structure.
Via the search field, suppliers can be searched by names. The selected supplier will be assigned to the object by double-clicking, or by clicking Apply. The same selection dialog can also be used for the assignment of price sets. For more information about price sets see Recipe → Functions & Processes → Using price sets.
Delete partner: The assigned supplier (price set) can be erased only when the object has not been released.
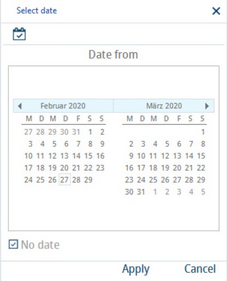
Date: This dialog enables changing the date for all price fields. Right-click on the date in the partner row and select Date.
